User Guide
Table of Contents
Getting started
Think of Video Hub App as YouTube on your own computer. It allows you to easily browse, search, sort, and organize your collection of videos.
Upon launching Video Hub App (VHA) for the first time, a wizard will guide you through the simple process of creating a new video file collection, called 'hub'.
The wizard will take you through the few simple steps of creating thumbnails, screenshots, and preview clips. Choose the size, duration, and number of all these items; they are the foundation for previewing your clips and browsing through your collection.
VHA creates a hub in two stages. First it captures video information (length, size, resolution), videos will start appearing in your hub but will not yet have screenshots. When the first stage is done, VHA will start generating thumbnails. During each stage a progress bar and a time remaining estimate will appear in the top-right corner.
The hub, <hub_name>.vha2, is the 'database' and all the screenshots are stored in vha-<hub_name> folder. Launching VHA will automatically open the hub you last viewed. You may move the .vha2 file and its accompanying folder, but you need to keep them together for the screenshots to show.
To create another hub, click on the 'Settings' button → 'Main settings' tab →'Create a new hub'.
You may also add as many folders as you wish to the current hub: click the 'Settings' button → 'Current hub' tab → 'Edit folders' → 'Add folder to hub'.
User interface layout
Below is the layout of Video Hub App's interface.
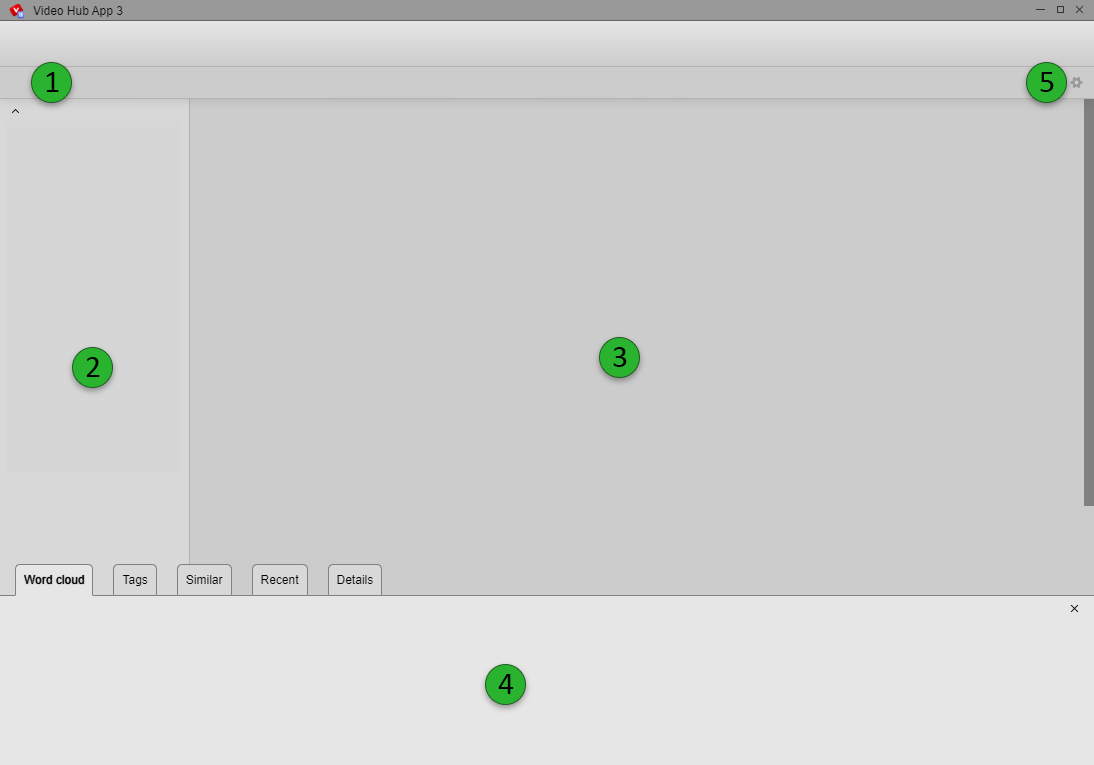
- Toolbar – Buttons to change how the app behaves. You can configure which buttons are shown or hidden here in the settings menu.
- Search, sort & filter – This sidebar is where you perform your search and narrow the results with a combination of filters (ratings, file size and duration, etc).
- Thumbnails - Main gallery window displaying selection results. You can choose different views in the toolbar on with keyboard shortcuts.
- Bottom tray - The bottom tray can show any of the five tabs. The 'Tags' tab will let you search and browse your tags, as well as add tags to many videos at once via 'Batch mode'. With 'Details' you can easily edit the last-clicked video's details. You can hide or show tabs via 'View settings' tab → 'Bottom tray' section.
- Settings - Opens the settings window, in which the program's behavior and features can be highly configurable through 5 tabs.
Tagging
Choose from any of the four places where you can add a tag to a video:
- Bottom tray 'Details' section
- 'Details view' in the gallery
- 'Details' popup when you click on the top-right of a video in the 'Thumbnails view'. You can also open this popup by holding the 'CTRL' key and clicking on a video
- You can also drag tags from the bottom tray to the desired video thumbnail in the main window
Create a new tag simply by typing the tag name and hitting the 'Enter' key on your keyboard. If you are entering an already-existing tag, you will see an autocomplete in blue; you can press the 'Tab' key on your keyboard to autocomplete. The tag will be assigned to the selected file, and will be available for autocomplete for other files.
To remove a tag: hover over the tag in any file, an 'x' will appear above the tag, click on the 'x' to remove the tag.
Batch tagging
A tag may be assigned to multiple files at once by using the 'Batch mode' in the 'Tags' tab in the bottom tray:
- Click the 'Batch mode' button in the tags tab of the bottom tray.
- Click on every video you would like to assign the tag to. Note a 'tag' icon appears on all selected files.
- Now click on the desired tag in the bottom tray. It will be added to all selected files.
Note the number next to the tag in the 'tags' tab. This number indicates the number of files tagged with this tag. As you assign a tag to multiple files, the number will increase accordingly.
Rating
Adding a rating to a video is simple: just click on the appropriate star for the selected file.
To remove a rating, click on the current rating (e.g. 4th star of a 4-star rating).
As you rate files, blue columns above the rating selector (sidebar on the left) indicate how many files received each rating.
Renaming
In the file details, click on any part of the name and edit as desired. Click 'Enter' to accept the edit, or 'Esc'. to cancel. Or you can right click on a file and click 'rename'
Changing thumbnail
Right click on a file, click 'Details'. From the thumbnail contact-sheet, hover over the desired video thumbnail and click on the faded star in the top-right corner. The star will light in yellow: this is the new thumbnail. To undo, click on selected star again. Press 'Esc' key on your keyboard or click outside the popup to exit.
To add a custom thumbnail for a video, you can drag and drop a 'jpg' or 'png' image file from your comptuer over any video in the 'Thumbnails view'
Settings
Many settings, features and options are accessible and customizable through settings (the cog icon, top-right).
Settings are not hub specific. Your configuration will be maintained regardless which hub you open.
The Settings section is divided into 5 main tabs:
Search settings tab
The 'Search settings' tab contains over 30 filtering, searching, and sorting tools that you may use in any desired combination to help you find the videos you want.
Many options in the 'Settings' section have an eye icon next to them. The left-most icon indicates whether the option is toggled on or off. An open eye icon means this button will appear in the toolbar, closed eye icon means the icon will not appear in the toolbar. Click it to toggle visibility. A button can be enabled but still be hidden from the toolbar.
Many options have an 'i' icon next to them. Hovering over the icon will provide further information about the setting.
We recommend you play around with the various options and features, until you find your favorite configuration.
You may always reset all settings and buttons to their default values, in the 'Main settings' tab → 'Various settings' section.
There is a 'Find duplicates' section which will let you find potential duplicates of your videos (by duration, size, or exact match).
View settings
This tab contains over 30 tools that control the way clips are viewed and displayed, as well as how the app interface looks. As in the 'Search settings' tab, you can control which tools are active, as well as their presence in the toolbar
All tools are distributed in more than 10 sections for easier navigation.
You are invited to experiment with the various settings - it is safe: there is a button to restore the app to its default settings.
Main settings
The 'Main settings' has several generic options, including:
- create new hub 'wizard'
- reset zoom level
- change language
- open current videos as a playlist
- change your preferred video player
- show or hide the delete option in your right click menu
- check whether a new version of VHA has been released
Current hub
The 'Current hub' tab allows you, among other actions, to:
- Add or remove folders from your hub
- Rescan a folder, adding new videos and removing any files you have deleted
- Toggle whether VHA should 'watch' for changes in a folder
- Reconnect to an 'input' folder that was renamed or moved
- Add missing thumbnails (click on 'Edit folders' button first)
- Delete thumbnails from deleted videos
- Start a local server that will allow you to connect to your hub via phone or tablet - like a 'remote control' for TV.
- See statistics about the video files in the current hub. This information includes: number of files and folders, sizes, duration, dimensions etc.
For security, the 'remote control' feature is disabled any time you turn off VHA or switch to a different hub. While 'remote control' server is running, anyone who connects to your WiFi and goes to the provided address will be able to see the screenshots in your hub.
Shortcuts
The 'Shortcuts' tab provides keyboard shortcuts to many frequently accessed functions.
You can easily modify shortcuts by clicking on a shortcut, and then pressing the new key on your keyboard.
To remove a shortcut, click it first, and then press the key that it is currently assigned.
Using search, sort & filter
You can search through your entire video collection using file and folder names, tags, video notes; and then filter the results using star ratings, file size, duration, etc - in any combination. The thumbnail area will reflect your selection in real time.
The 'Sorting options' dropdown will let you sort the results in many ways, just enable or disable them in the 'Search settings' tab in settings.
- Enter any part of a folder or file name name in the appropriate field
- Click on a tag, from the 'Tag' tab in the bottom tray, to insert it into the 'Tags include' searchfield
- Shift-click on a tag to insert it into the 'Tags do not have' field
- Type the tag name into the 'Tags include any' search field (boolean 'or')
- Enter text into 'notes have' search to show only videos that include this text in the notes section
How to & trouble-shooting
Add new videos to your collection
If you add a new video to a folder which VHA is watching (enabled 'watch folder' in 'Current hub' tab in settings), VHA will add it to your gallery. Alternatively you can click 'rescan' in the 'Current hub' tab in settings.
If the video does not show up, please check that you do not have search filters (in the sidebar) that would exclude the video (for example new videos do not have star ratings but you are currently filtering for videos that are above 3 stars).
You can sort videos by 'Times played' (new videos have not been played and so would appear at the top). Similarly, you can sort by 'Date Modified' so the newer files on your computer appear at the top.
If you add star ratings to all your files, you can filter (in the sidebar) for unrated videos (so only unrated 'N/A' videos are shown); now when you add a star rating to a video, it will will disappear from view in the gallery as it as it no longer matching the filtering criteria ('N/A' stars).
Moving your hub to a different location
You can move your hub <hub_name>.vha2 anywhere as long as you keep it next to the vha-<hub_name> folder (just close VHA first). Note: please place it in a folder path that has no spaces in it (e.g. 'C:\movies\' and not 'C:\my movies\'). Now just double-click on the .vha2 file and your hub should work like before.
If you would like to move your 'input folder' (where all your videos are) to another location, no problem (just close VHA first). After you open the app, you will see this:
Your videos appear with a yellow dot on them, and when you click, VHA says 'Video folder not connected'. Note: this can also happen if you stored your videos on an external hard drive, but when you connected it, your computer labeled it with a different letter and VHA now does not 'see' it.
- Optionally: back up the <hub_name>.vha2 file (copy to another location just in case; note: there is no need to copy the accompanying vha-<hub_name> folder.
- Go to settings → 'Current hub', and click on 'Not connected' (looks like text but it is a button).
- A browsing window (from your operating system) will prompt you to select the folder in its new location.
- Find the folder in its new location, click on it, and then click the button 'Select folder'.
- Please click on any video to confirm that it works.
If you open VHA and it shows a 'File not found:' error, it is because when you open VHA it tries to open the hub you viewed last. Don't worry: just close VHA, find the hub on your computer, and double-click on it. Now VHA will know where to find your hub.
Thanks to Oren for creating this user guide